Enzymes for Gluten-Free Brewing
Making sense of the many kinds of enzymes that can be used to brew gluten-free beer

Which mashing enzymes should you use for gluten-free brewing? It’s not always obvious, since none of the commercially available enzymes were specifically designed for our purposes.
Still, by working with enzymes originally created for the needs of macro-brewers and the food processing industry, we can create a variety of high-quality gluten-free worts to match any beer style.
Below, I’ll provide an overview of the common types of enzymes out there, how they work, and why you might choose one over the other.
Beyond alpha and beta: understanding your starch
Before you can decide on enzymes, you need to understand what you’re working with. I provided a quick overview of how starch works in my Five Myths article, but just to recap:
- Starch is made up of long chains of glucose molecules
- Straight chains are called amylose, while branched chains are called amylopectin
- The ratio of each type will vary by grain type and variety, but all grains are predominantly amylopectin
- Starch needs to be gelatinized by hot water before enzymes will work on it
- Maltose, the preferred food for beer yeast, is a sugar made up of two glucose molecules

A diagram of the various glucose-derived molecules, from the simplest form up to amylopectin. Keep in mind that amylose chains can be over 100 glucose units long and amylopectin can branch multiple times into a dense web.
In a traditional malted barley context, after the starch has been gelatinized, dozens of enzymes work together to unravel amylopectin, break up amylose, cut up those strands into maltose and several other sugars, and perform a whole host of other functions. In a gluten-free mash, the same thing happens, it’s just that you might have to add in some enzymes that were destroyed by the higher gelatinization temperatures required by our grains.
Note that I didn’t mention α- or β-amylase anywhere in that description. The greek letter categories are not that important for our purposes and can lead to dead ends in gluten-free brewing. The main thing you need to know is that α- and β-amylase are not individual enzymes but categories of enzymes that evolved to do similar things in different contexts:
- α-amylases are produced by plants, bacteria, and animals (including humans) and break down starches at random points, creating everything from glucose on up.
- β-amylases aren’t produced by animals at all, but many variations have evolved in plants. They work by chewing off individual maltose molecules from the ends of longer starches.
Because α-amylases are so much more common in nature, there are a lot of different varieties available on the market at relatively affordable prices. Most have been isolated from bacterial strains and selected for specific behaviors. In contrast, there are not a lot of β-amylases out there, and the ones that exist are very expensive. So we’ll mostly be using α-amylases in our brewing.
In addition to α-amylases, you may want to consider a number of other enzymes that are present in malted barley but that often get denatured in gluten-free brewing. These break down fats and proteins and may also help to increase the nutrient content of your wort. None of these secondary enzymes are mandatory, but they can help take your mash to the next level.
Liquefaction enzymes
Examples: Termamyl, SEBStar, SEBAyml BAL, included in Ondea Pro and Ceremix Flex
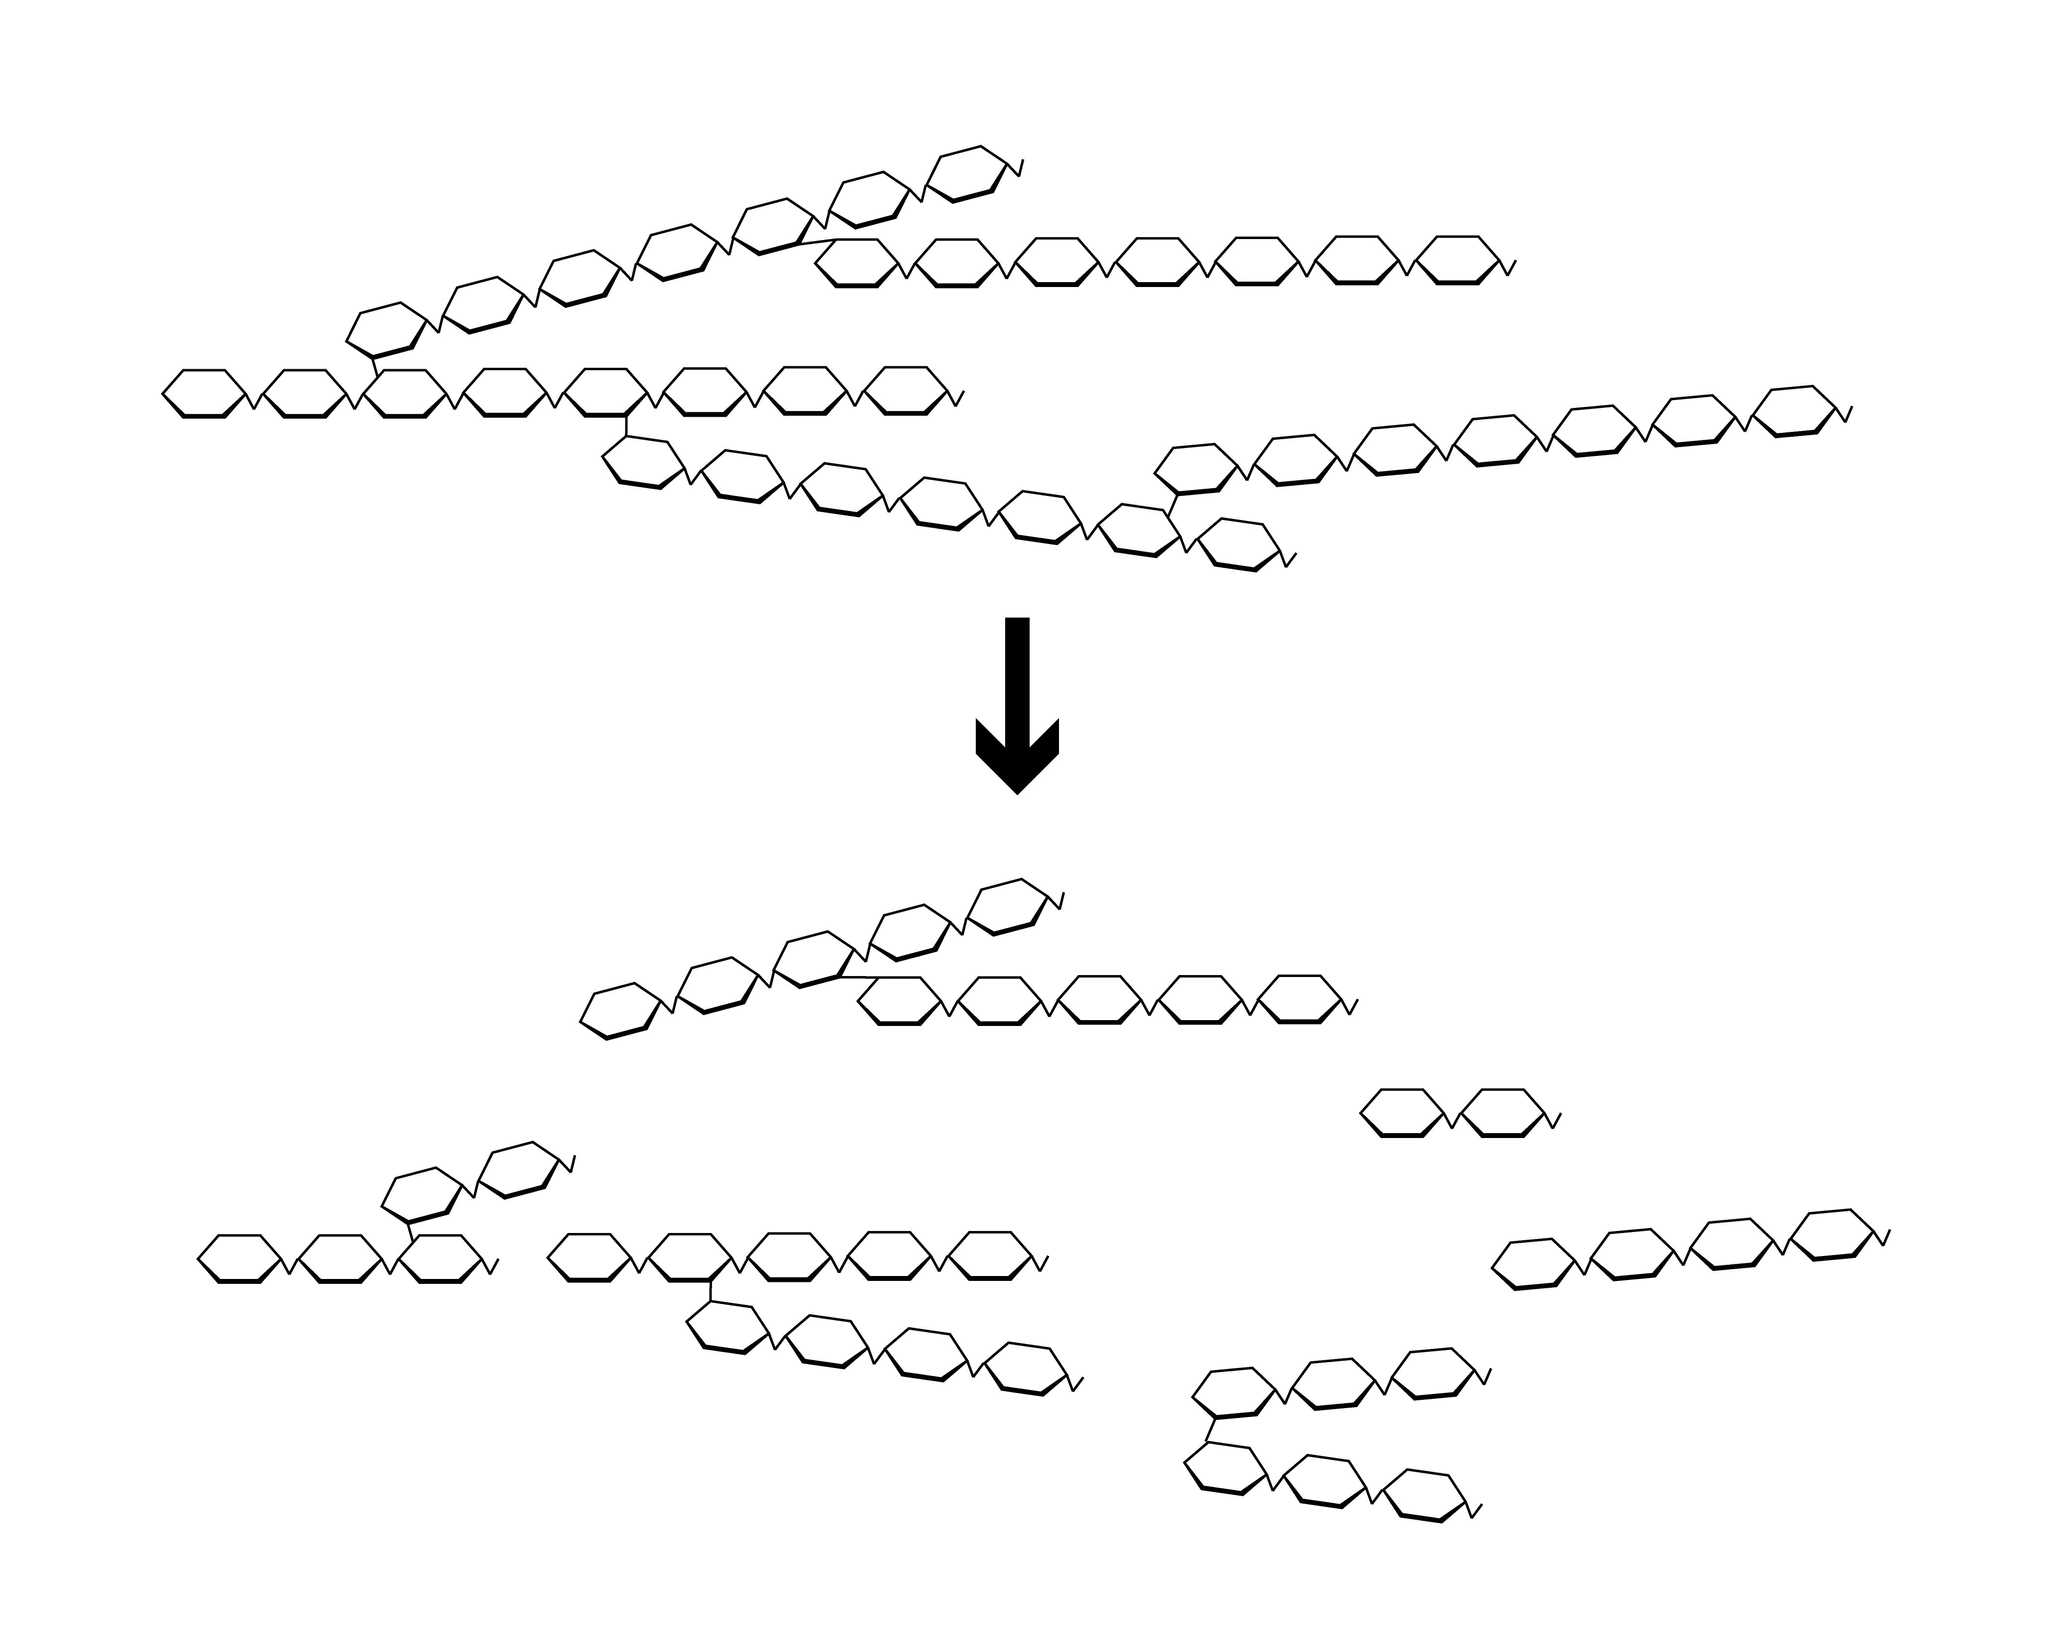
Every mash you do will require a liquefaction enzyme. These take long starch molecules and break them down into medium-length versions. The result is that your mash goes from thick and gummy, like porridge, to a thinner, more liquid state. That improves lauterability and allows you to extract the starch from the grain.

In starch liquefaction, long chains of amylose or amylopectin are broken down into medium-sized chains.
Used alone, these enzymes don’t give you a lot of fermentable sugars, maybe in the range of 30% or so. I’ve done some tests to see if time is a factor in fermentability, but it doesn’t seem to be; you just get more yield until most of the starch is extracted.
(One caveat here is that the types of grains used may affect the fermentability as well; Jason Yerger reports he can get good fermentability with Termamyl alone on certain grain bills, but I have never personally been able to achieve the same result.)
The reason you would choose one liquefaction enzyme over the other is for its temperature range. An enzyme like Termamyl works best at a higher temperature around 180°F, appropriate for rice, whereas SEBAyml BAL works better in the lower 155°F range, which is acceptable for an all-millet mash.
It’s also worth noting that almost all of the common liquefaction enzymes out there require at least 50 ppm of calcium in solution in order to work properly, with the exception of the Termamyl SC DS version of Termamyl (there are four “flavors” of Termamyl). So make sure to plan for that when you’re doing your mineral additions.
Saccharification enzymes
Examples: AG 300, Fungamyl, SEBAmyl GL, SEBAyml L, included in Attenuzyme Pro and Ceremix Flex
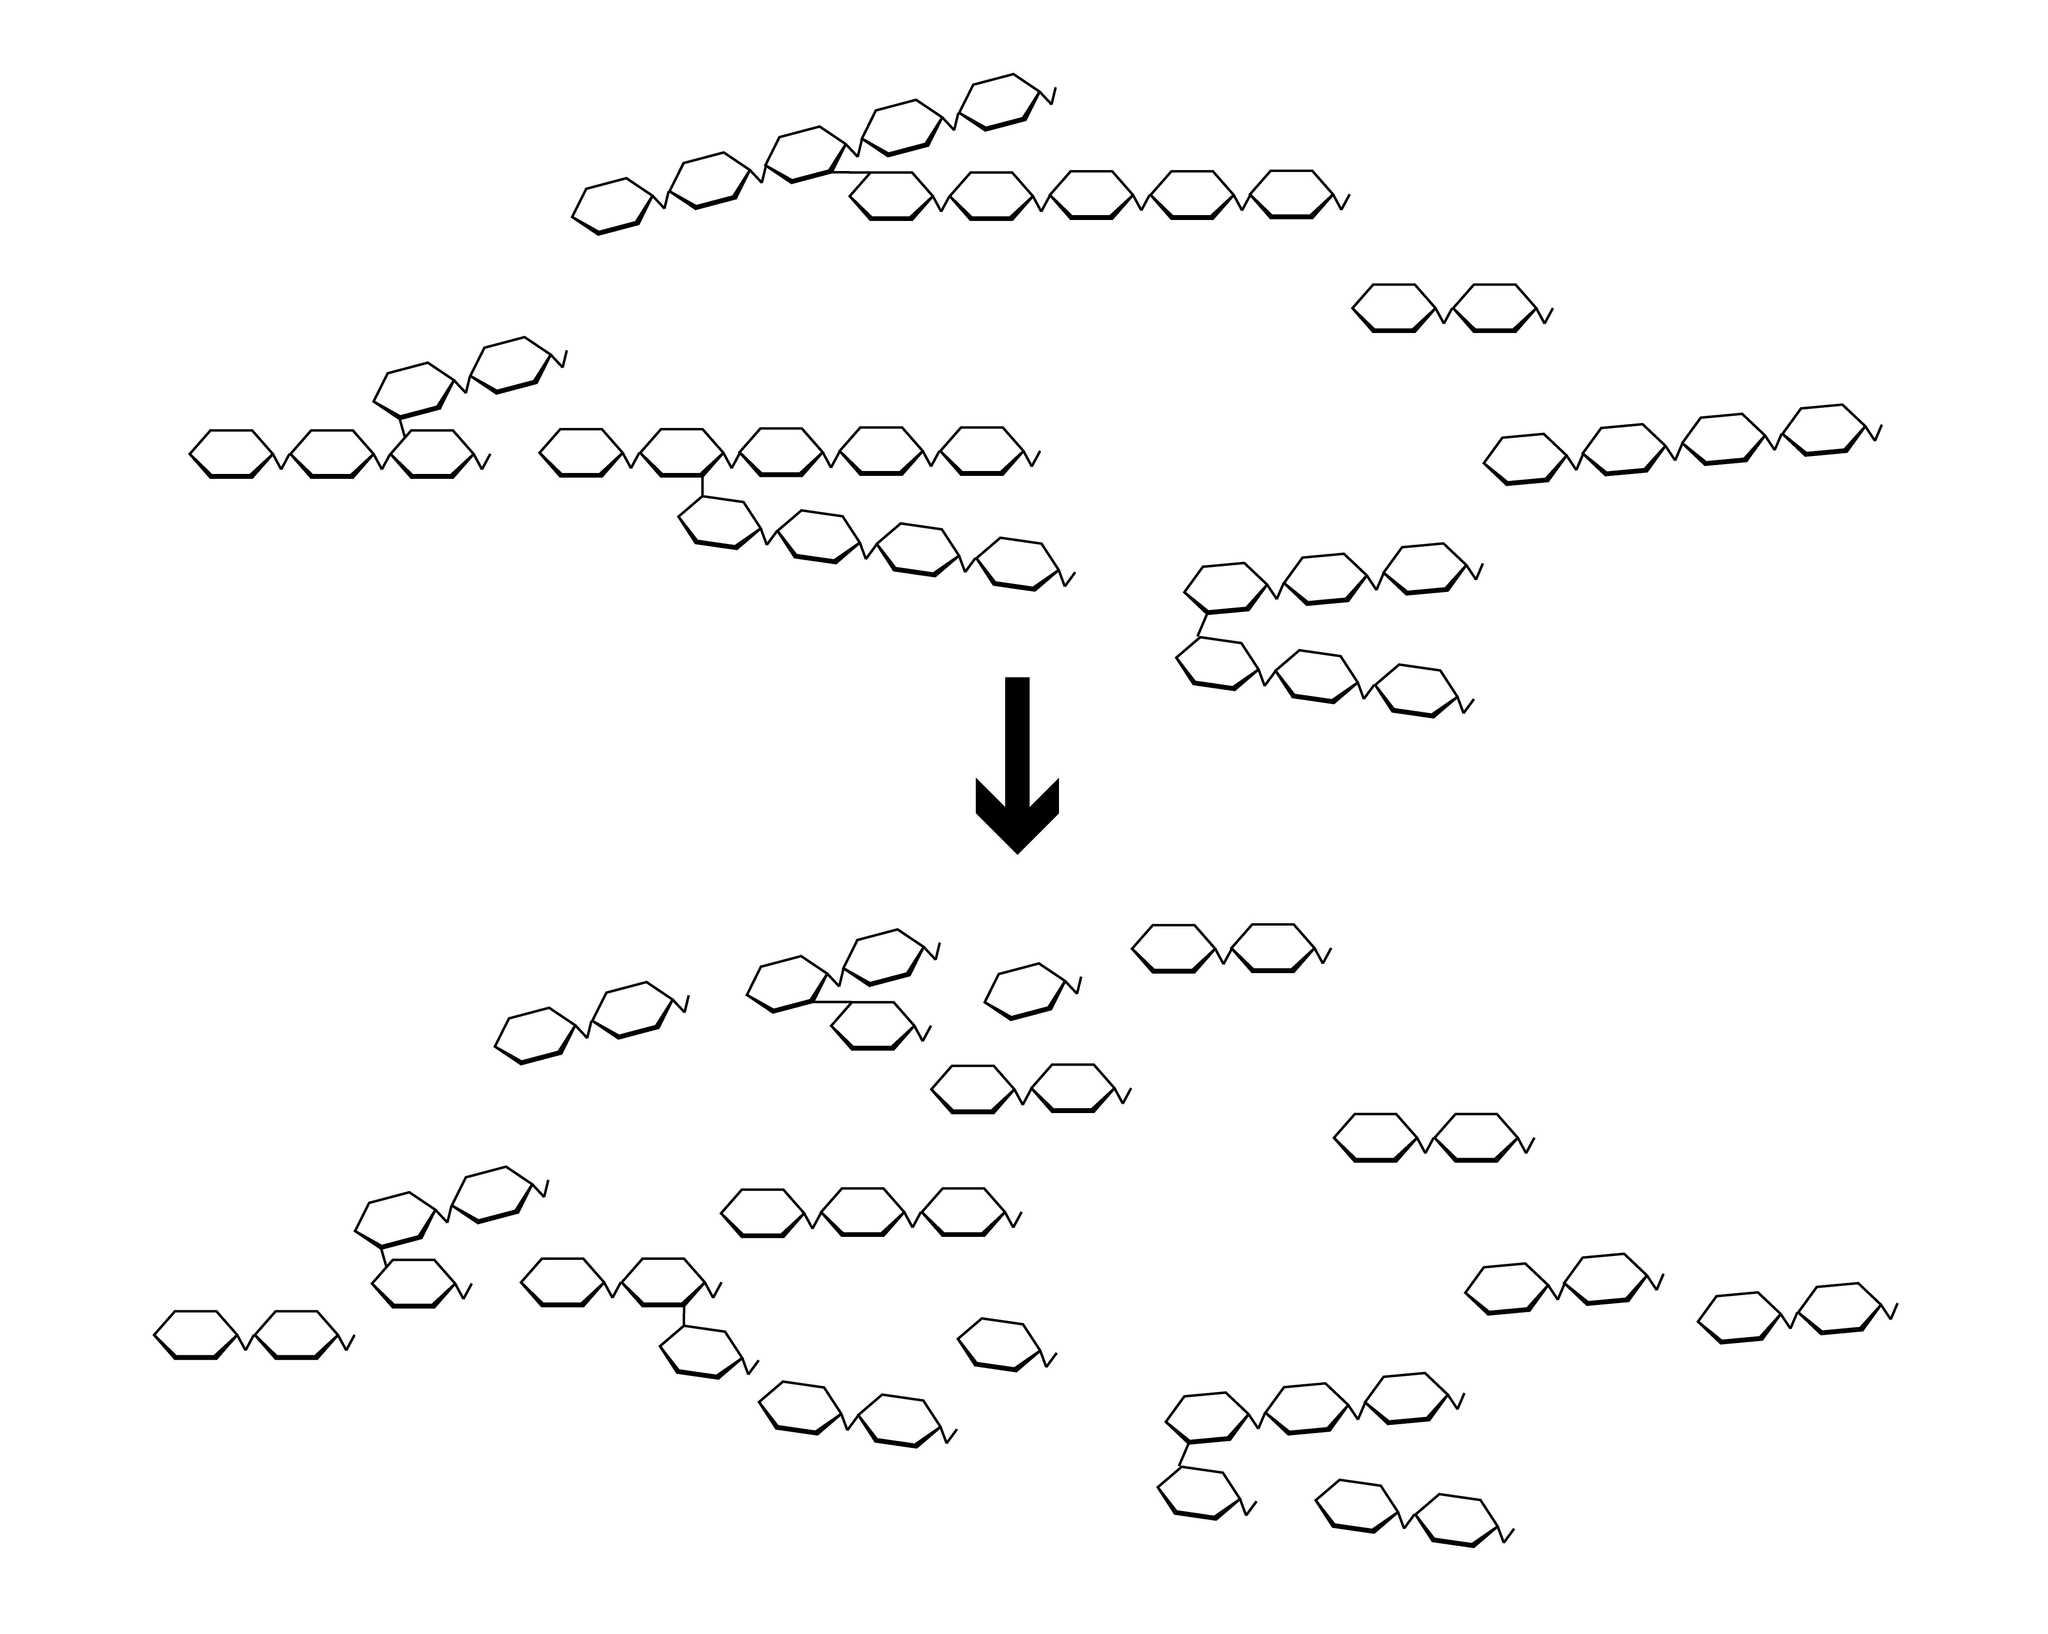
If you want your wort to be fermentable, you’ll need one of these enzymes. They don’t work as well for liquefaction, but once the starch is in liquid form, these enzymes will make quick work of the medium-sized chains, turning them into your desired sugars.

In saccharification, starch molecules are broken down into various fermentable sugars and dextrins.
Saccharification enzymes come in two basic forms: maltogenic and glucogenic. That simply describes the type of sugar each creates. Since maltose is the traditional food for beer yeast, I usually reach for maltogenic enzymes first (Fungamyl, SEBAyml L, or Ceremix Flex).
All of the maltogenic options out there are α-amylases, meaning that they will attack the starch at random points, not at the ends the way β-amylase does. However, as they break up starch chains, they bite off two-glucose units, giving you a wort that is predominantly made of maltose. They can’t break up 1,6 bonds, so those remain in solution as dextrins. I have found that in typical mash conditions using mostly base malts, maltogenic enzymes will give you a wort with a fermentability in the low 70% range.
If you want to increase fermentability, you can use the glucogenic options. Left to work long enough, these can theoretically break down 100% of the starch in solution. In normal mash conditions, these will get you closer to 80-85% fermentability depending on the mash temperature and how long the enzymes are allowed to work.
Debranching enzymes
Examples: included in Attenuzyme Pro, included in Ondea Pro and Ceremix Flex
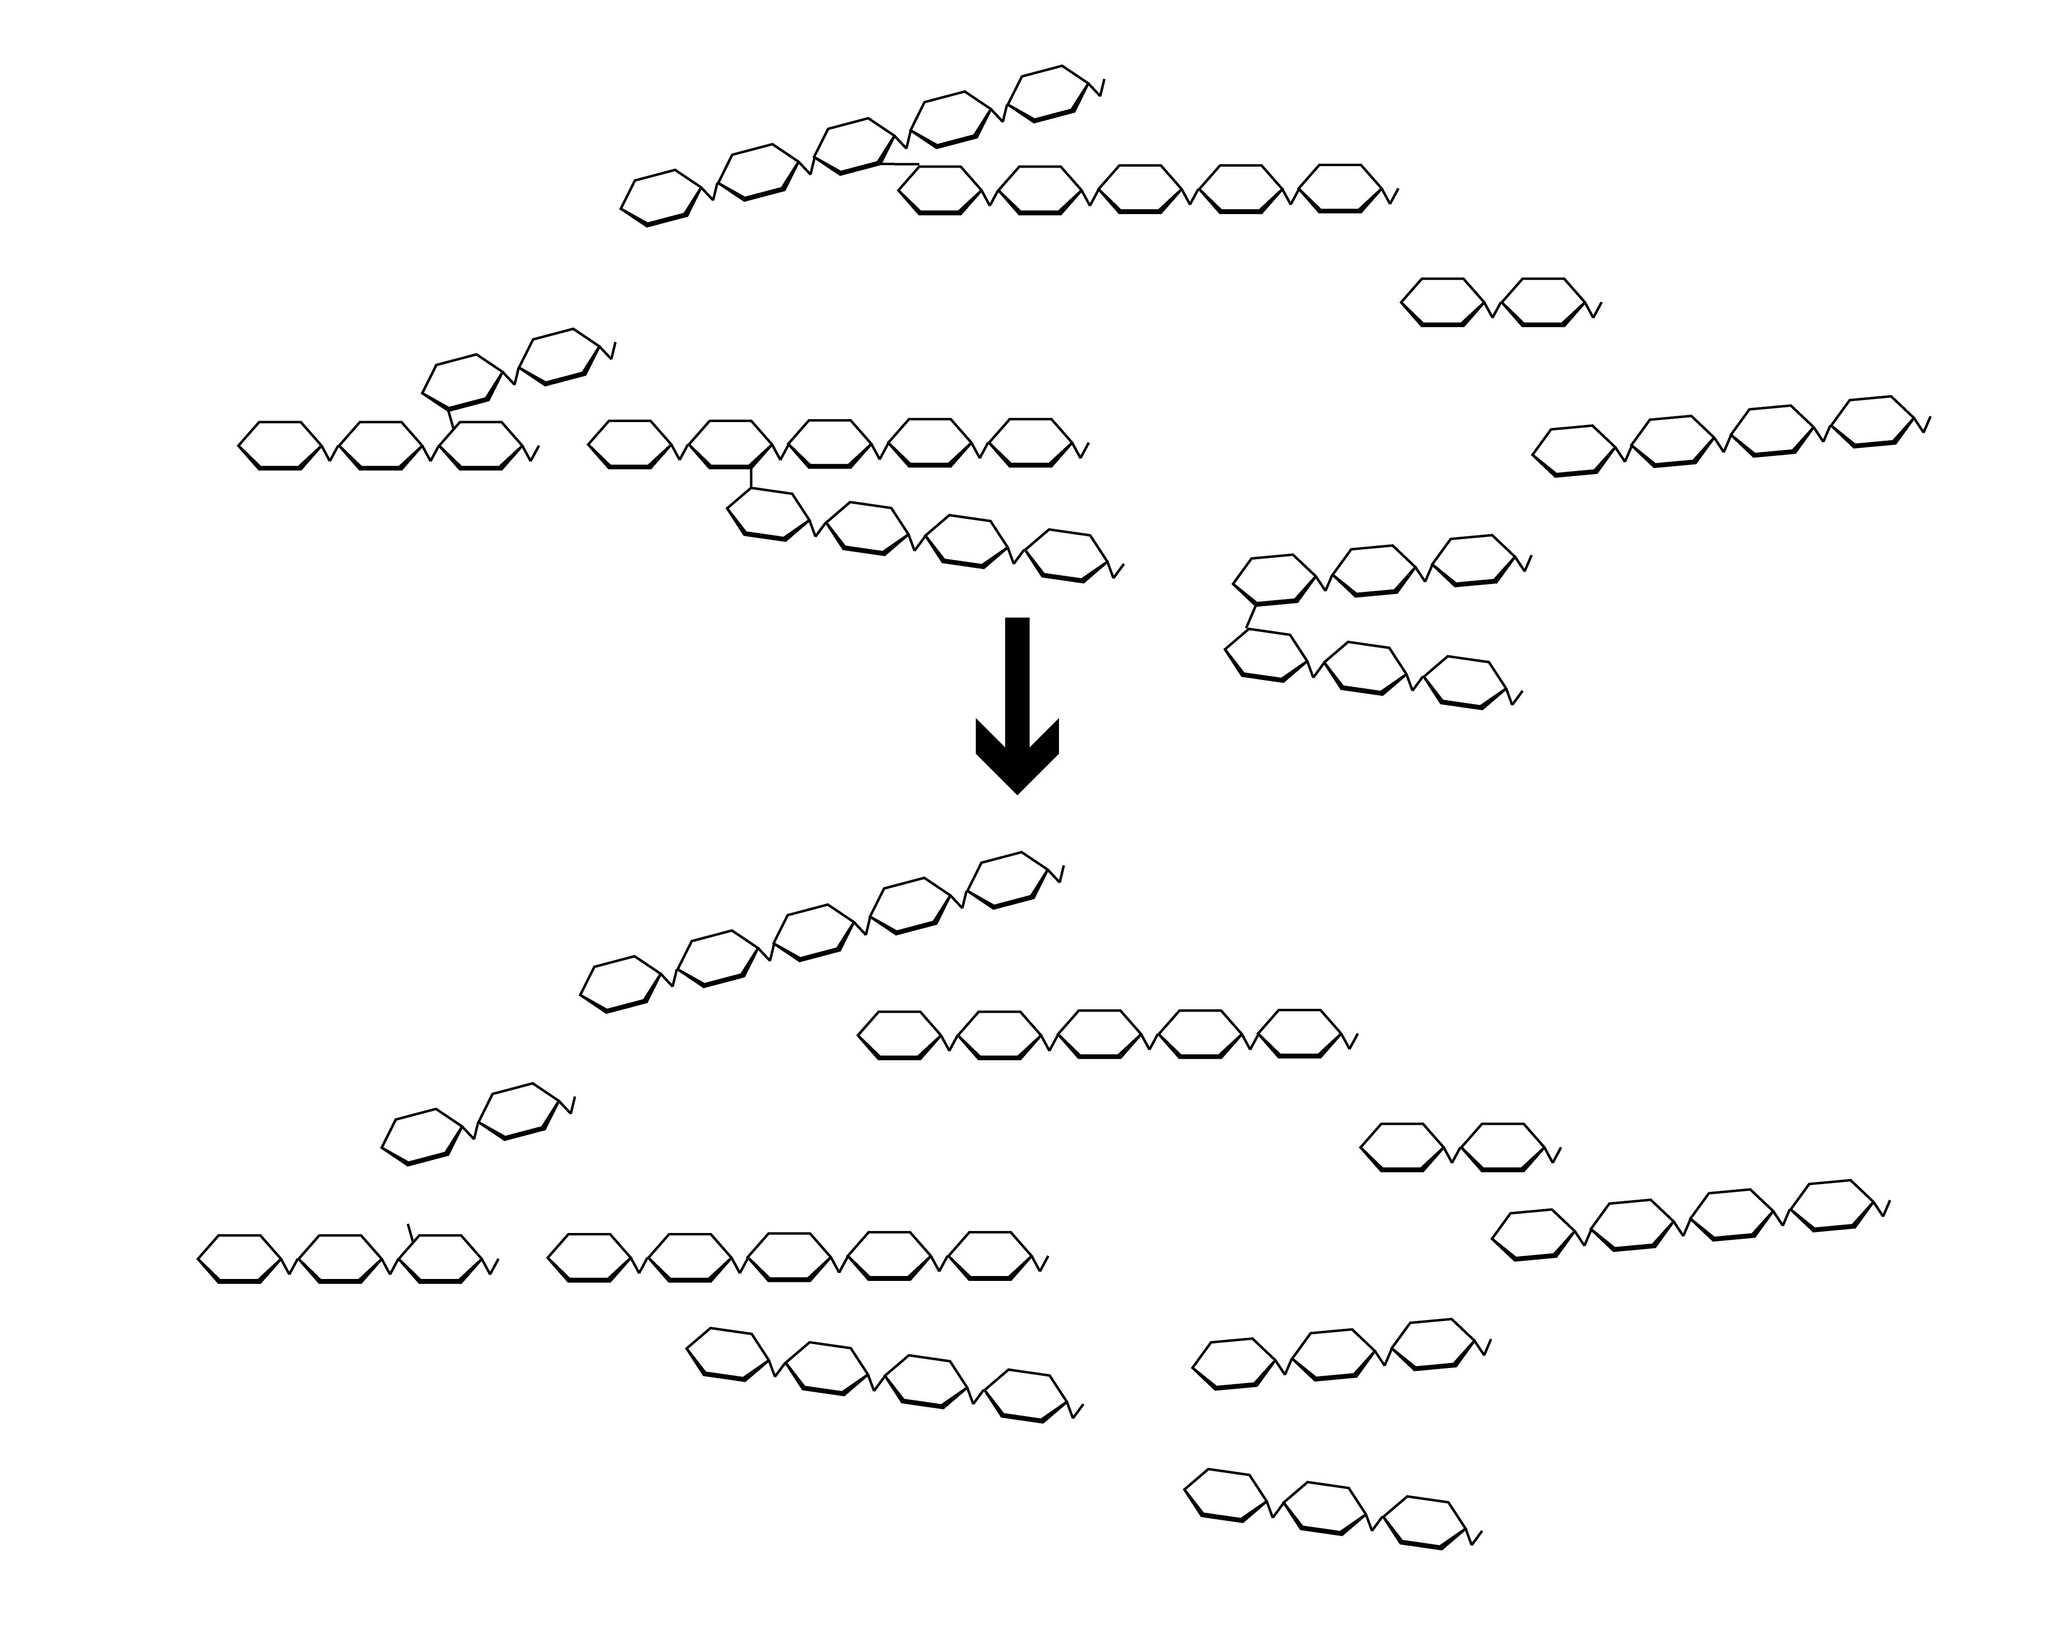
The starch in cereal grains of any species is predominantly amylopectin, usually over 80%. Debranching enzymes, officially called pullulanases, attack the 1,6 bonds that form each pectin branch, liberating them into simpler amylose chains for your other enzymes to chew on.

Branched amylopectin molecules are broken into straight amylose molecules by pullulanase.
It’s hard to find a standalone debranching enzyme, since they’re not super useful on their own; the three listed above are all enzyme cocktails. Debranching enzymes are definitely not mandatory for gluten-free mashing, but they help to improve yield by detangling amylopectin branches.
When I first tried these enzymes, I also expected them to increase fermentability, but that doesn’t seem to be the case—at least not from what I’ve observed. It’s possible that with further experimentation they could increase fermentability, since they are technically making it easier for your saccharification enzymes to do their thing. I haven’t yet had time to explore this in detail, however.
Non-starch enzymes
Examples: SEBPro, ViscoSEB L, included in Ondea Pro
Malted barley contains many enzymes that break down non-starch structures, and you can get some of these enzymes in liquid form. Probably your best option is the all-in-one Ondea Pro cocktail, which is a sort of “malthouse in a bottle” that provides most of the key enzymes generated during the malting process.
Using Ondea Pro, you could theoretically replace your base malt with unmalted grain (this is why it was invented). However, Ondea Pro doesn’t include a β-amylase, since the enzyme exists naturally in unmalted grain. Therefore, presuming you’re using a typical gluten-free grain with a high gelatinization temperature, you still need to add a saccharification enzyme.
The key enzymes in Ondea Pro are β-glucanase, xylanase, protease, lipase, a liquefaction α-amylase, and pullulanase. Why would you want all of this? To increase yield, lauterability, nutrient content, and flavor stability. You can get good beer without these enzymes, but to really take things to the next level, it’s a helpful addition. I find I have an easier time getting clear wort with Ondea Pro, and the wort flavors are somehow “cleaner.”
Putting it all together
Now that you’ve got a sense of what each of these enzymes do, you can figure out which combinations will work best for your recipes. The enzyme combinations you would use for, say, a rice-based pilsner, might be completely different from those you’d use for a millet-based stout.
You probably also need to adjust enzyme choices to match the specifics of your equipment. It’s always a three-way conversation between equipment capabilities, gelatinization temperatures, and desired wort quality.
At a certain point, you may also find it useful to track down the manufacturers’ datasheets. These are usually available by googling the enzyme. One particularly useful resource is Novozyme’s Brewing Handbook (PDF), a 63-page reference for their beer enzyme catalog. It’s designed for macro-sized barley brewers, but there is a lot of information in there that we can apply to our needs as well.
